Dlshad Othman
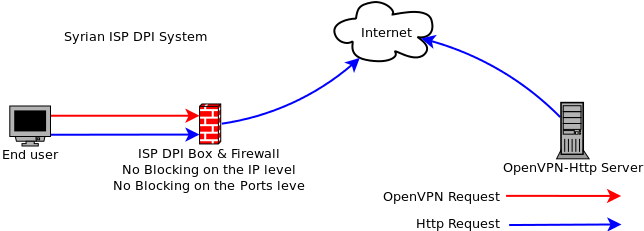
Syrian ISPs are using sophisticated technologies to monitor and filter traffic. These boxes are DPI (Deep Packet Inspection) and what they do is sniff out every little packet flowing through them to find specific patterns and then they provide their administrator with the option to block traffic that matches these patterns. These boxes are very sophisticated and they don’t just filter traffic by src, dst or port, they filter traffic by the content the packets carry.
Since August 2011 Syrin regime applied the DPI and they start blocking OpenVPN – L2TP/IPSec and sometimes TOR connection , in order to not allow any user has a secure connections.
Tor Action :
Tor as one of the main anonymity providers , DPI was able to block its traffic over the “Digital fingerprint of it’s traffic “
Tor said “ An increasing number of censoring countries are using Deep Packet Inspection (DPI) to classify Internet traffic flows by protocol. While Tor uses bridge relays to get around a censor that blocks by IP address, the censor can use DPI to recognize and filter Tor traffic flows even when they connect to unexpected IP addresses. “
In response to that, Tor deployed a technology called Pluggable Transports which it can obfuscate the traffic to looks like “nothing!” that will drive the DPI evil boxes to go Crazy! The traffic is not easy recognizable! 😀
How can we use it?
In Syria for the last 2 years , people were able to use ( openvpn and SSH ) connections in order to encrypt their traffic , and now only SSH connection is working ,and other encrypted connections “through obfsproxy” I don’t think they will block ssh , because (SEA) need it to do their operations -_- also the government has servers around! need to be managed!
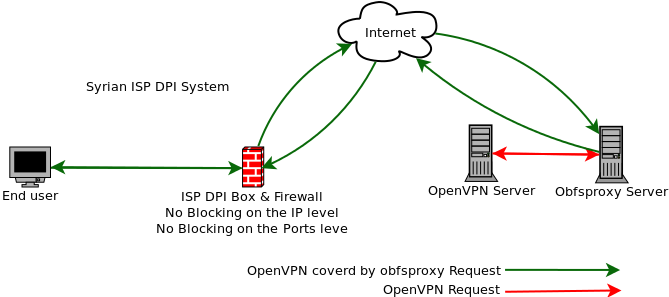
The best way to use it is to have obfsproxy with open vpn or with SSH
The Scenario:
End user : A regular user before the Syrian Firewall has ( Obfsproxy + OpenVPN client)
ISP DPI Box: The DPI filtering system
OpenVPN Server: OpenVPN Server configured to receive OpenVPN requests from the obfsproxy Server.
Obfsproxy Server: obfsproxy server configured to receive obfsproxy connection from outside world and uncover it then send regular openvpn requests to openvpn Server.
OpenVPN client (Local)—> obfsproxy client (Local) —-> obfsproxy server —> openVPN Server
Note: you can use one server running obfsproxy and openvpn Server
Install openvpnServer Ubuntu – Debian server:
Personally , I would prefer to use Ubuntu or Debian server ,they have great documentation online.
Step 1
you need root access to your server SSH it and let’s rock & roll 🙂
Install openVPN
run the following command in the terminal
sudo apt-get install openvpn
Then, you have to answer by yes then press enter
– Generate the certificates
Step 2
You need to generate Server Certificates:
run the following command to copy the standards cert , configuration ..etc samples and tools.
sudo cp -r /usr/share/doc/openvpn/examples/easy-rsa/2.0 /etc/openvpn/easy-rsa2
Then access to the openvpn Easy RSA folder (run this command )
cd /etc/openvpn/easy-rsa2
First you need to edit variables from the standards to your own , like your email , name ..etc
Run the following command :
sudo nano vars
“ Maybe you don’t have nano editor , you can install it by running the following command sudo apt-get install nano “
export KEY_COUNTRY=”XX”
export KEY_PROVINCE=”YY”
export KEY_CITY=”City”
export KEY_ORG=”My VPN Service”
export KEY_EMAIL=”[email protected]”
Run the following commands , one by one :
sudo mkdir keys
source ./vars
sudo -E ./clean-all
sudo -E ./build-ca
sudo -E ./build-key-server server
sudo -E ./build-dh
sudo cp /etc/openvpn/easy-rsa/2.0/keys/ca.crt /etc/openvpn
sudo cp /etc/openvpn/easy-rsa/2.0/keys/ca.key /etc/openvpn
sudo cp /etc/openvpn/easy-rsa/2.0/keys/dh1024.pem /etc/openvpn
sudo cp /etc/openvpn/easy-rsa/2.0/keys/server.crt /etc/openvpn
sudo cp /etc/openvpn/easy-rsa/2.0/keys/server.key /etc/openvpn
After that you need to restart the OpenVPN Server:
run the following command:
sudo service openvpn restart
– Generate Client Certificates
cd /etc/openvpn/easy-rsa2
source ./vars
sudo -E ./build-key user1
user1 ( is the user nick name you can change it to whatever)
Then copy the following files (user certificates)
ca.crt
user1.crt
user1.key
from the server side to the client side over secure connection like ssh of SFTP
– Configure OpenVPN Server
Run the following commands , first we need to add user to the system called openVPN with no privileges to SSH the server
sudo adduser –system –no-create-home –disabled-login openvpn
sudo addgroup –system –no-create-home –disabled-login openvpn
then we need to copy the standards openVPN configuration files by running the following commands
sudo cp /usr/share/doc/openvpn/examples/sample-config-files/server.conf.gz /etc/openvpn/
then
sudo gunzip /etc/openvpn/server.conf.gz
then
cd /etc/openvpn
Edit the Server configuration file by running the following command
sudo nano server.conf
change user and group:
user openvpn
group openvpn
Then restart openVPN by running the following command :
sudo service openvpn restart
To make sure that it’s working , run the following command
ifconfig
You should have tun0 interface in the network interfaces list
Note : Installing and configuring openVPN Server will not allow you to routing the web traffic to the client , you should enable that
to do it :
Run the following commands:
cd /etc/openvpn
sudo nano server.conf
uncomment this line:
“uncomment means removing the # from the beginning of the line “
push “redirect-gateway def1 bypass-dhcp”
Then restart the openVPN Server by running the following command
sudo service openvpn restart
We also need to enable IP forward on the Server , to do that run the following command:
echo 1 > /proc/sys/net/ipv4/ip_forward
Run the following bash codes to allow the IPTABLES secure Internet tunnel
- If your server is a Dedicated server or XEN VPS server then:
Code:#!/bin/sh
#
# iptables example configuration script
#
# Flush all current rules from iptables
#
iptables -F
iptables -t nat -F
iptables -t mangle -F#
# Allow SSH connections on tcp port 22 (or whatever port you want to use)
#
iptables -A INPUT -p tcp –dport 22 -j ACCEPT#
# Set default policies for INPUT, FORWARD and OUTPUT chains
#
iptables -P INPUT DROP #using DROP for INPUT is not always recommended. Change to ACCEPT if you prefer.
iptables -P FORWARD ACCEPT
iptables -P OUTPUT ACCEPT#
# Set access for localhost
#
iptables -A INPUT -i lo -j ACCEPT#
# Accept packets belonging to established and related connections
#
iptables -A INPUT -m state –state ESTABLISHED,RELATED -j ACCEPT#
#Accept connections on 1194 for vpn access from clients
#Take note that the rule says “UDP”, and ensure that your OpenVPN server.conf says UDP too
#
iptables -A INPUT -p udp –dport 1194 -j ACCEPT#
#Apply forwarding for OpenVPN Tunneling
#
iptables -A FORWARD -m state –state RELATED,ESTABLISHED -j ACCEPT
iptables -A FORWARD -s 10.8.0.0/24 -j ACCEPT #10.8.0.0 ? Check your OpenVPN server.conf to be sure
iptables -A FORWARD -j REJECT
iptables -t nat -A POSTROUTING -s 10.8.0.0/24 -o eth0 -j MASQUERADE#
#Enable forwarding
#
echo 1 > /proc/sys/net/ipv4/ip_forward#
# Some generally optional rules. Enable and disable these as per your requirements
## Accept traffic with the ACK flag set
iptables -A INPUT -p tcp -m tcp –tcp-flags ACK ACK -j ACCEPT
# Accept responses to DNS queries
iptables -A INPUT -p udp -m udp –dport 1024:65535 –sport 53 -j ACCEPT
# Accept responses to our pings
iptables -A INPUT -p icmp -m icmp –icmp-type echo-reply -j ACCEPT
# Accept notifications of unreachable hosts
iptables -A INPUT -p icmp -m icmp –icmp-type destination-unreachable -j ACCEPT
# Accept notifications to reduce sending speed
iptables -A INPUT -p icmp -m icmp –icmp-type source-quench -j ACCEPT
# Accept notifications of lost packets
iptables -A INPUT -p icmp -m icmp –icmp-type time-exceeded -j ACCEPT
# Accept notifications of protocol problems
iptables -A INPUT -p icmp -m icmp –icmp-type parameter-problem -j ACCEPT
# Respond to pings
iptables -A INPUT -p icmp -m icmp –icmp-type echo-request -j ACCEPT
# Accept traceroutes
iptables -A INPUT -p udp -m udp –dport 33434:33523 -j ACCEPT#
# List rules
#
iptables -L -v- If your server is an openVZ VPS then:
Code:#!/bin/sh
#
# iptables example configuration script
#
# Flush all current rules from iptables
#
iptables -F
iptables -t nat -F
iptables -t mangle -F#
# Allow SSH connections on tcp port 22 (or whatever port you want to use)
#
iptables -A INPUT -p tcp –dport 22 -j ACCEPT#
# Set default policies for INPUT, FORWARD and OUTPUT chains
#
iptables -P INPUT DROP #using DROP for INPUT is not always recommended. Change to ACCEPT if you prefer.
iptables -P FORWARD ACCEPT
iptables -P OUTPUT ACCEPT#
# Set access for localhost
#
iptables -A INPUT -i lo -j ACCEPT#
# Accept packets belonging to established and related connections
#
iptables -A INPUT -m state –state ESTABLISHED,RELATED -j ACCEPT#
#Accept connections on 1194 for vpn access from clients
#Take note that the rule says “UDP”, and ensure that your OpenVPN server.conf says UDP too
#
iptables -A INPUT -p udp –dport 1194 -j ACCEPT#
#Apply forwarding for OpenVPN Tunneling
#
iptables -A FORWARD -m state –state RELATED,ESTABLISHED -j ACCEPT
iptables -A FORWARD -s 10.8.0.0/24 -j ACCEPT #10.8.0.0 ? Check your OpenVPN server.conf to be sure
iptables -A FORWARD -j REJECT
iptables -t nat -A POSTROUTING -o venet0 -j SNAT –to-source 100.200.255.256 #Use your OpenVPN server’s real external IP here#
#Enable forwarding
#
echo 1 > /proc/sys/net/ipv4/ip_forward#
# Some generally optional rules. Enable and disable these as per your requirements
## Accept traffic with the ACK flag set
iptables -A INPUT -p tcp -m tcp –tcp-flags ACK ACK -j ACCEPT
# Accept responses to DNS queries
iptables -A INPUT -p udp -m udp –dport 1024:65535 –sport 53 -j ACCEPT
# Accept responses to our pings
iptables -A INPUT -p icmp -m icmp –icmp-type echo-reply -j ACCEPT
# Accept notifications of unreachable hosts
iptables -A INPUT -p icmp -m icmp –icmp-type destination-unreachable -j ACCEPT
# Accept notifications to reduce sending speed
iptables -A INPUT -p icmp -m icmp –icmp-type source-quench -j ACCEPT
# Accept notifications of lost packets
iptables -A INPUT -p icmp -m icmp –icmp-type time-exceeded -j ACCEPT
# Accept notifications of protocol problems
iptables -A INPUT -p icmp -m icmp –icmp-type parameter-problem -j ACCEPT
# Respond to pings
iptables -A INPUT -p icmp -m icmp –icmp-type echo-request -j ACCEPT
# Accept traceroutes
iptables -A INPUT -p udp -m udp –dport 33434:33523 -j ACCEPT#
# List rules
#
iptables -L -vwith the only difference between the two codes being that the masquerade command was replaced with a SNAT in the openVZ example, and eth0 was replaced with venet0.
Now please note:
your openVPN Server is ready to use anywhere but not in Syria 🙂 that’s why we need to install opbfsoroxy.
Let’s name all the elements and put (Virtual IP address)
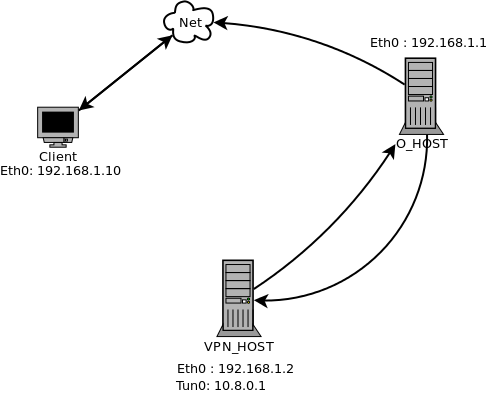
Client : User before the Syrian Firewall has ( Obfsproxy + OpenVPN client)
O_HOST: obfsproxy server configured to receive obfsproxy connection from outside world then send openvpn requests to openvpn Server with eth0 IP address : 192.168.1.1
VPN_host Server: OpenVPN Server configured to receive OpenVPN requests from the obfsproxy Server connection with eth0 IP address 192.168.1.2 , and Tun0 IP address 10.8.0.1
How to do it?
– Install Obfsproxy Server:
Step 1
by running this command in the Terminal to install the needed lib autoconf + pkg-config + git
apt-get install autoconf
apt-get install pkg-config
apt-get install git
then, it will ask you for your root password
Then, you have to answer by yes then press enter
after finishing
you have to run this command in the terminal
sudo git clone https://git.torproject.org/pluggable-transports/obfsproxy-legacy.git
cd obfsproxy-legacy/
sudo ./autogen.sh && ./configure && make
sudo make install
- Tunnaling obfsproxy from outside to OpenVPN:
obfsproxy server ---> openVPN Server
Step 1
Let's make the O_HOST obfsproxy server to listen for connection and redirect to VPN_HOST:
Run the following command on the O_HOST:
screen obfsproxy --log-min-severity=info obfs2 --dest=192.168.1.2:1194 server 0.0.0.0:80
Note : maybe you need to install screen app, by running the following command Sudo apt-get install screen
The “dest” : is the server where you want to redirect to connection to , “Server” is where you want to accept the connection from , “0.0.0.0:80” means, accept the connections from any IP address over the port 80 🙂
Now: Your servers are ready to work 🙂 let's go to the client side
– Install Obfsproxy and OpenVPN on the client side:
For Linux Ubuntu, Debian, client
Note: Virtus Linux already has obfsproxy (you don’t have to install it )
Step 1
Install OpenVPN
by running this command in the Terminal
sudo apt-get install openvpn
then, it will ask you for your root password
Then, you have to answer by yes then press enter
Step 2
– install obfsproxy
by running this command in the Terminal
sudo apt-get install autoconf autotools-dev gcc git pkg-config libtool libevent-2.0-5 libevent-dev libevent-openssl-2.0-5 libssl-dev
then, it will ask you for your root password
Then, you have to answer by yes then press enter
after finishing you have to run this command in the Terminal to install the needed lib autoconf + pkg-config + git
apt-get install autoconf
apt-get install pkg-config
apt-get install git
then, it will ask you for your root password
Then, you have to answer by yes then press enter
after finishing
you have to run this command in the terminal
sudo git clone https://git.torproject.org/pluggable-transports/obfsproxy-legacy.git
cd obfsproxy-legacy/
sudo ./autogen.sh && ./configure && make
sudo make install
- Configuration of openVPN client side :
Step1
We need to make a client configuration files , run the following command :
cd /etc/openvpn/
then
sudo nano client.ovpn
paste the following text:
### Client configuration file for OpenVPN

# Specify that this is a client
client

# Bridge device setting
dev tun

# Host name and port for the server (default port is 1194)
# note: replace with the correct values your server set up
# Note: the remote ip address that we should use in the openvpn over obfsproxy should be the
#--obfsproxy , in our example is the following :

remote 192.168.1.1 80

# Socks-proxy means , the connection will be forwarded to the obfsproxy application through socket over
#--the port 9090

socks-proxy 127.0.0.1 9090


# Client does not need to bind to a specific local port
nobind

# Keep trying to resolve the host name of OpenVPN server.
## The windows GUI seems to dislike the following rule.
##You may need to comment it out.
resolv-retry infinite

# Preserve state across restarts
persist-key
persist-tun

# SSL/TLS parameters - files created previously when we did the configuration for the
#openvpn server side and I asked you to move it over secure connection, all the files should be placed
#at /etc/openvpn/ folder
ca ca.crt
cert user1.crt
key user1.key

# Since we specified the tls-auth for server, we need it for the client
# note: 0 = server, 1 = client
tls-auth ta.key 1

# Specify same cipher as server
cipher BF-CBC

# Use compression
comp-lzo

# Log verbosity (to help if there are problems)
verb 3
Save the file ( Ctrl + o ) then Yes and Enter
step2
Running obfsproxy on the client side
obfsproxy will receive connections from openvpn application locally , and send it to obfsproxy server , to do that you need to run the following command
sudo screen obfsproxy --log-min-severity=info obfs2 socks 127.0.0.1:9090
now your setup is ready to work , you need to run the openvpn connection
- Running the openvpn connection:
Run the following command on the client side:
sudo openvpn --config /etc/openvpn/client.ovpn
To test that
go to www.whatismyipaddress.com you should have new IP address = 192.168.1.2
- Using SSH Tunnel over obfsproxy:
The Scenario:
Note: the IP address are virtual , use your real once.
SSH Client : A regular user before the Syrian Firewall has ( Obfsproxy + ssh tunnel client)
SSH_HOST : Regular SSH Server configured to receive SSH requests from the obfsproxy Server .
O_HOST: obfsproxy server configured to receive obfsproxy connection from outside world and uncover it then send SSH requests to openvpn Server.
SSH client (Local) ---> obfsproxy client (Local) ----> obfsproxy server ---> SSH Server

Step 1
Note: You need to install Obfsproxy Server, back to the same instructions that I used in the setup openVPN over pbfsproxy
Tunneling obfsproxy server to SSH server
obfsproxy server ---> SSH Server
Let's make the O_HOST obfsproxy server to listen for connection and redirect to SSH_HOST:
Run the following command on the O_HOST:
screen obfsproxy --log-min-severity=info obfs2 --dest=192.168.1.2:22 server 0.0.0.0:80
Note : maybe you need to install screen app, by running the following command Sudo apt-get install screen
The “dest” : is the server where you want to redirect to connection to , “Server” is where you want to accept the connection from , “0.0.0.0:80” means, accept the connections from any IP address over the port 80
- Add SSH users to the server :
in the SSH_Host
run the following commands
useradd username
then enter
It will ask you to add the password and retype it
some servers doesn't ask to add password for users , so you should run the following command
passwd username
then enter
It will ask you to add the password and retype it
- Running SSH client over obfsproxy
You need to reconfigure the client SSH application to allow it make connection to the O_HOST over Port 80 , and redirect the connection to the SSH_HOST
On the client machine
edit ~/.ssh/config , run the following command
sudo nano ~/.ssh/config
add the following lines
Host 192.168.1.1
ProxyCommand /bin/nc.openbsd -x 127.0.0.1:9090 %h %p
This will force all SSH connections to O_HOST to pass through the local (obfsproxy) socks server listening on 127.0.0.1:9090
Now run the following command on the client side to make the SSH connection
ssh -p 80 [email protected] -D 9090
That’s it. The connection will now pass get obfuscated locally, pass through obfsproxy server at O_HOST and then finally reach it’s destination at SSH_HOST.
Note: now on the client side you need to connect all your browsers , internet access application to the following address:
SOCKS PROXY 5
IP Address : 127.0.0.1
Port: 9090
to test it go to www.whatismyipaddress.com the ip address should be = 192.168.1.2
Note: I tested all what's in the paper , for more information please [email protected]
Recurse :
1- OpenVPN https://help.ubuntu.com/community/OpenVPN
2- Tor: Pluggable Transports https://www.torproject.org/docs/pluggable-transports.html.en
3- Tor Project obfsproxy https://www.torproject.org/projects/obfsproxy.html.en
4- KheOps personal blogs at http://syria.telecomix.org/
5- IPTABLES secure Internet tunnel at https://forums.openvpn.net/topic7722.html

please update the obfsproxy way of installation to use the most recent python based version
You can view the updated version here: https://www.pluggabletransports.info/implement/openvpn/
Thanx do you have a new version of your website I like to read your article